Get started on AWS
Your project is generated, it is almost ready to be deployed to AWS.
Configure the deploy user
In order to deploy the stack on a development environment, you will need to setup a user on the stack.
This step is only for the development environment. For staging and production environment, we recommend following the guidelines in the configure your CI/CD section.
- Head to the IAM console
- Add a new user, give it a name (we will use
swarmion-devin the following steps) - In "AWS access type", select "Programmatic access", then click on "Next: permissions"
- Click on the "Attach existing policies directly", then select "AdministratorAccess" and click on "Next: tags"
- Click "Next: review", then "Create user"
- Do not close the window yet
- Open a terminal and run:
aws configure --profile swarmion-dev - Fill in the Access Key Id and the Secret Access Key from your user
- For the region, use the AWS region chosen for your project. See the list of AWS regions
- Leave the default output format prompt empty, as the default is
json - Change the dev profile name in
sharedConfig.ts:packages/serverless-configuration/src/sharedConfig.tsexport const sharedParams = {
dev: { profile: 'swarmion-dev' },
staging: { profile: '' }, // leave empty for staging
production: { profile: '' }, // leave empty for production
};
Deploy the stacks
At the root of the project, run pnpm run deploy. This will compile and deploy all the stacks in order.
You can follow the creation of the stacks on the Cloudformation console.
At this time, there is only one stack in the project, the core stack. We will deploy another stack in the next step of the tutorial.
The following architecture is deployed:
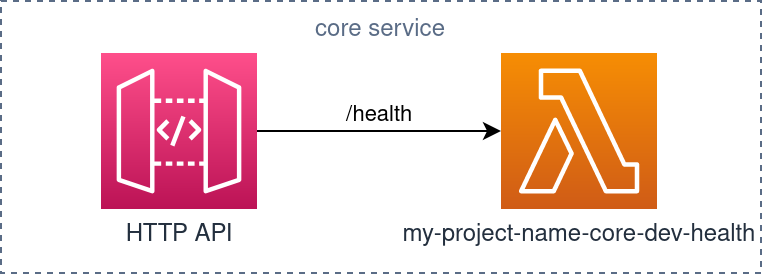
An HTTP API Gateway and a Lamda called my-project-name-core-dev-health.
The API Gateway exposes an endpoint GET /health which is an integration with the Lambda. Calling the endpoint will execute the Lambda and return the result.
To call the endpoint, you can find the Invoke URL of your API Gateway in the AWS console, then append /health and call it, for example:
http https://b1c15ee1u8.execute-api.us-east-1.amazonaws.com/health

HTTP/1.1 200 OK
Apigw-Requestid: XHjHzjQcIAMEVBA=
Connection: keep-alive
Content-Length: 2
Content-Type: application/json
Date: Fri, 19 Aug 2022 15:54:26 GMT

ok
Here we use the neat httpie command line tool to call the endpoint.
Deploy a change to the stack
Let's change the result of the health lambda and deploy it.
Go to services/core/functions/health/handler.ts and replace the existing code with the following:
export const main = async (): Promise<string> => {
  return Promise.resolve('Hello Swarmion 🐝');
};
Then deploy the stack by running the following commands in a terminal located at the root of the project:
cd services/core
pnpm run deploy
When you call the endpoint, we can see the updated result:
http https://b1c15ee1u8.execute-api.us-east-1.amazonaws.com/health

HTTP/1.1 200 OK
Apigw-Requestid: XHn0shXfoAMEVdQ=
Connection: keep-alive
Content-Length: 19
Content-Type: application/json
Date: Fri, 19 Aug 2022 16:26:31 GMT

Hello Swarmion 🐝
When, like in this case, you only need update the source code of a lambda, there is no need to deploy the whole stack. You can use the following command to solely deploy the lambda:
pnpm serverless deploy function -f health
Wrap up
You now have successfully deployed your project to AWS in a dev environment. It is still a fairly simple one with a single serverless service. In the next part, we will add a second serverless service to the project 🚀